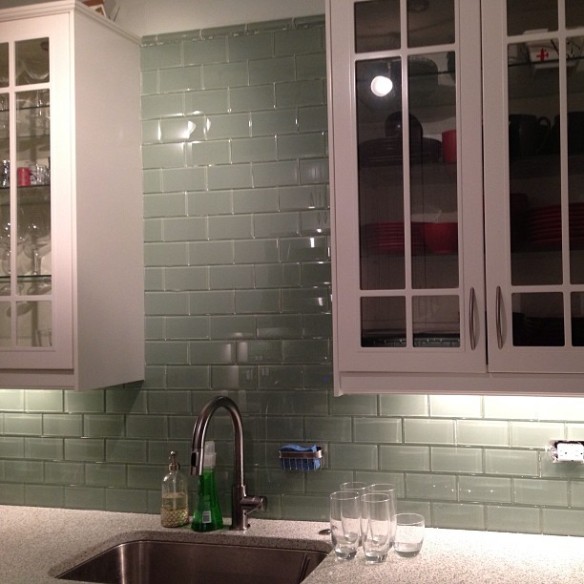
Tile Away, Tile Away…

you put me up, and I won’t fall…I am gla-a-a-ss… okay, no one wants to hear me sing, but I bet you do want photos of gorgeous green subway tile on my kitchen walls.

BAM! Here you go:

2497_946281083275_1349709587_n 559958_943503255065_789656889_n 537630_946279022405_609060511_n

Of course, the magic of the internet makes this look SO much easier than it actually was, but I am absolutely loving how much it changes the kitchen already and we haven’t even grouted it yet!

The first wall, on the sink side, took a LOT longer than the second wall, since we were trying to get a feel for how much thinset to use, how to cut the tiles around the outlets (YUCK!) and making sure we had all of the spacing correct. But since it turned out pretty darn well, the second wall seemed to take much less time.

Hopefully the grouting will go smoothly and then we’re down to just a few final finishing touches!! Can you hear the fat lady warming up??? Oh wait, that was just me singing that Titanium song again. 😉

Excuse me, are those real countertops?

Approximately seven months ago, our kitchen looked something like this:

And then… after a few weekends of work, it looked like this:

Now, it looks a little something like this:

Dan and I can’t stop exclaiming “we have countertops!!” every time we walk into the room. It’s just simply been WAY too long since we’ve had a functional kitchen.

But let me back up just a little bit to help explain why this step seems even more amazing to us. Right before we left for our vacation, the folks from the Countertop Factory came out and measured to get the exact dimensions for our countertops, and told us we had to wait 7-10 business days for installation. Unfortunately, while we were on vacation we received an email telling us they expected the material to be delayed at least 3 weeks. Then, another email a few weeks later letting us know it wouldn’t be available until November 2. We were so disappointed, but we tried to be patient until they were finally scheduled to deliver and install the countertops and the sink on Wednesday, Nov. 7. I worked from home and scheduled the electrician’s return visit, the countertop installation AND our wine fridge repair (a story for another day) all on the same day. At the end of the day, I was ready to have the most amazing kitchen ever… but it ended up that only the electrician came that day, and didn’t even complete everything while he was here.

The problem was apparently a discoloration issue from the fabricating table that had stained the countertops, so we had to wait until Saturday for them to use a solvent on it and get the discoloration out before they could steal and install it.

But finally the day arrived, and now our kitchen looks like THIS:

WE HAVE COUNTERTOPS!!! AND A SINK!!! AND A DISPOSAL!!!


One, Two, Three, Floor!

I should really relabel this post, one-month, two-month, three-month, floor!

It’s been a long, long time coming, but on July 27, we finally laid some of the first planks of flooring in our kitchen!

But before I go into too much detail about the flooring, let’s recap how the pantry doorway finally got finished.

When the workers ‘finished’ their work in our place, they left the door of the pantry looking like this:

Our neighbor, who is going to custom make the doors for us, let us know that this wouldn’t work, particularly since it wasn’t even finished off evenly on both sides (I’m sorry, I know it’s tough to see in the photo).

So after a long wait of trying to schedule the contractor to come back out and finish it off, we finally agreed that we would make it clean and drywalled around like we had the other door to the laundry room. Unfortunately, after their first day back in the kitchen, we ended up like this:

And then like this, when we said that the first way was NOT going to work:

But the good news is… it ended up like this:

And then we got started on the floor!

A little bit worse, a little bit better (Kitchen Dishin’)

This weekend we took the next step in our kitchen remodel, after a break last weekend to attend a friend’s wedding in Virginia. We got the last remaining scraps of the old flooring up from under the walls, and laid the subfloor.

We needed to find 1/4″ plywood subfloor pieces, since we wanted to find the right depth between the joists and the top of the cork flooring to come up even with the rest of our hardwood flooring throughout the apartment. It’s fairly thin, and we couldn’t get it with tongue and groove because it was so thin, but it should work out well.

We did have a bit of an adventure getting the plywood, since we couldn’t fit it inside or tie it on top of our car – we had to rent a UHaul and drive it back and forth – it took forever. But we got it and got it all done working into the early hours of the morning.

And while it doesn’t look like much, it is actually a bit better:

But before we got to that point, we had to make it a little bit worse:

This week, the contractor is working on tearing up the rest of the old pantry and laundry room entrance, and building the new ones! SO EXCITED!

Oh, and because I haven’t shared the photo with everyone, I wanted to share the photo that inspired the pantry we’re developing, courtesy of Pinterest: (source: http://www.closet-shelf.com).

I love the french doors, and I’m hoping that I’ll be able to do some cabinets on the far end, even though I won’t have enough room to do it on the long wall. Can’t wait to show you all the finished product… once it’s final, of course.


Making it Worse, Before it Gets Better: Kitchen Edition

Quick note to begin: I know I have a year and a half’s worth of backlogged projects to blog about, but I am going to get started with current stuff now, and then work my way back to recapping previous projects.

And now on to Making it Worse, Before it Gets Better: Kitchen Edition!

We have officially torn up our kitchen!

After months of no progress due to insane work schedules and lack of motivation, I finally couldn’t handle living in our condo with half of our stuff in the kitchen, our appliances in the dining room and nothing where it was supposed to be anywhere in our condo. (I know, took me long enough, right!?) So I decided to do something about it. I took out ALL of the supplies from the kitchen and set up a schedule for the kitchen remodel.

The week of April 9, we took photos of the cabinets, the oven/range and the microwave and posted it all on Craigslist, to see if we could sell some of it. Then, that weekend, we set about unscrewing (and in some cases ungluing) the cabinets from the walls, disconnecting the microwave and the oven/range, and arranging times for people to pick up the items from our kitchen.

As luck would have it, we were able to sell ALL of it!

And so last week, our kitchen sat completely empty, until we were able to start the next phase of demo – tearing up the hardwood floors!

Our good friend, Carl, came over and helped us painstakingly tear up each and every board in our kitchen, most of which had two flat, serrated nails driven in to attach them to strips of board underneath a tar paper. We had to move the washer and dryer into the dining room (Sad!), and found a few holes along the way, but by the end of the day on Saturday (4/21), we had torn up all of the flooring.

That morning, I had looked into ways to dispose of the wood once we had torn it all up, investigating options like the Rebuilding Exchange (who would only take it if we de-nailed it, which was NOT going to happen), Habitat for Humanity Re-Store (who would take it if it could be re-used (most couldn’t be), and didn’t have drop off times on Sunday), and a dump site in Melrose Park (which would have cost us $50). We also listed it on Craigslist and Freecycle.com for free, to see if anyone might be able to use it.

By the time we had torn it all up, we hadn’t received any bites from Craigslist or Freecycle.com, so we loaded all of the wood into our neighbor’s truck (thank you, Joel!) and prepared to take the scrap wood to the dump the next day, despite the $50 charge, just to get it out of our way!

But, as luck would have it, we had a few offers come in over night from people on Craigslist who were interested in trying to salvage the wood. I called up one that looked particularly promising, and we were off Sunday morning to drop off the wood at his house, where he was hoping to use pieces of it to patch a portion of his own kitchen floor. We unloaded it into his garage, and while Dan played golf with Carl, I worked on cleaning up the last of the scraps and garbage that we found under the flooring (broken light bulbs, lighters, pieces of tape measure, scraps of wood, etc.). And by the end of the day on Sunday, our kitchen looked more like this:

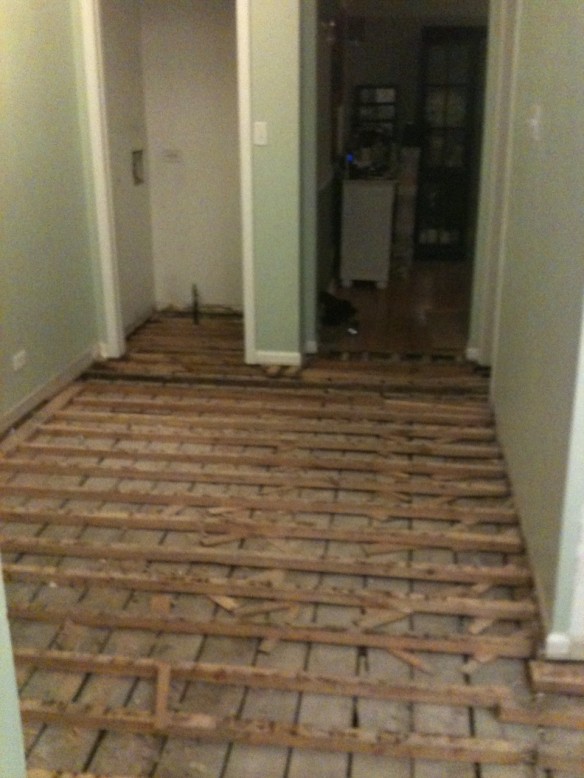
Next steps:
– Speak with the contractor about a few questions we have about laying the subfloor, the pantry and the laundry room
– Get the subfloor laid and prep for the contractor to do the pantry and electric work.
– Get samples of the countertop and make decisions about tile and paint!

It’s still going to be a while before our kitchen is completed, but I’m really excited to be seeing progress and I can’t wait to see the final results of all of our hard work!

A Touch of Our Honeymoon

Shower at Arenal Nayara

Though it’s a bit difficult to see from the photos below, I’ve been trying to bring a touch of our Costa Rican honeymoon into our bathroom. The outdoor shower at our hotel in La Fortuna was truly relaxing, (doesn’t Dan look relaxed in that photo?), so I’m trying to incorporate elements of that shower into our every day lives.

As you can see, I’ve already incorporated one plant in the shower area, and I’ve tried to keep the palette of the room fairly neutral, like the stone in the inspiration photo, so that I can bring in some splashes of color and more plants. I also incorporated a waterfall so you get the Costa Rican feel, even when you’re not taking a shower, and the bamboo elements through the bath accessories. I’m also planning to add more fabric to the shower curtain to add length and bring it more top to bottom. I had originally purchased a piece of brown, linen-like fabric to put on the bottom, but after re-looking at these photos, I’m thinking it might be a nice opportunity to add a splash of color, a warm orange, perhaps?
But… this is definitely the room in which we’ve made the most progress… at least so far!